How do I upload my model?
install sketchup & citygml plugin
CityGML is a Windows-only plugin. Mac users must install a Windows Virtual Machine, then install SketchUp in Windows.
1. Install Sketchup 2014 for the Windows operating system.
2. Download the CityGML plugin. The Proforma is configured to accept output from this version of the plugin. Other CityGML plugin versions, available at the developer's site, will not work.
3. Unzip (or extract) the CityGML ZIP file, making sure you preserve folders and subfolders. Folders and sub-folders within the .zip archive must be preserved when extracting. When using WinZip, for example, there is an option, "use folders," which must be checked. If using 7-Zip, "Full Pathnames" should be set for "Path mode" (default option).
4. Copy CityGMLExtension.rb and the CityGML folder (including all files and subfolders).
5. Paste the copied files into this folder on your computer:
C:\Users\[username]\AppData\Roaming\SketchUp\SketchUp 2014\SketchUp\Plugins
6. Start SketchUp. You should be able to see CityGML in the Plugins menu.
Prepare the Sketchup model for CityGML Export
I. Simplify the Design
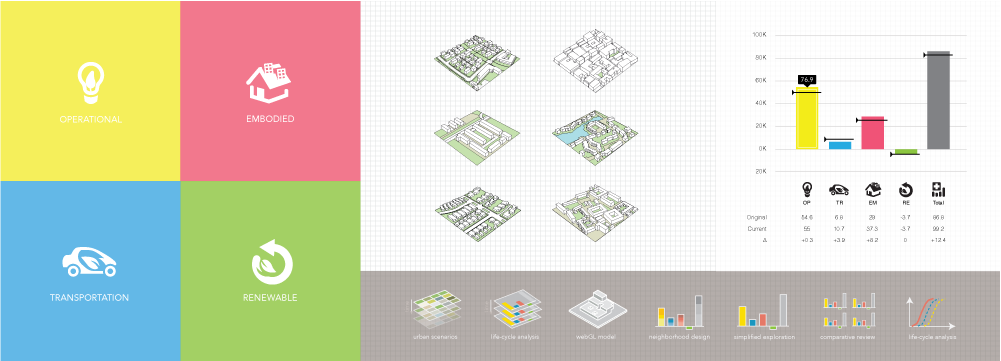
We need to simplify the 3D neighborhood models for the online Energy Proforma. First, a simplified analysis model will allow you to iteratively assess the energy performance of your neighborhood design and adjust the design accordingly. Second, the online Energy Proforma is a new tool that is under development. The current version contains only the basic and most important variables, which limits the details necessary for the input model. Starting from a basic plan, you can simplify your design in the following steps:
1. Select typical or representative clusters as samples rather than building the whole neighborhood model. Your overall neighborhood design can be based on these building blocks. Usually the typical cluster should be at least 180m * 180m.
2. Leave only buildings and roads in the model. The current online Energy Proforma can evaluate only building and road attributes. Other urban design features, such as water bodies, railways, etc, are out of the scope of web tool calculation. Other urban design elements will be added as the web tool develops.
3. Simplify your building forms to basic, rectangular blocks, rather than building complex forms.
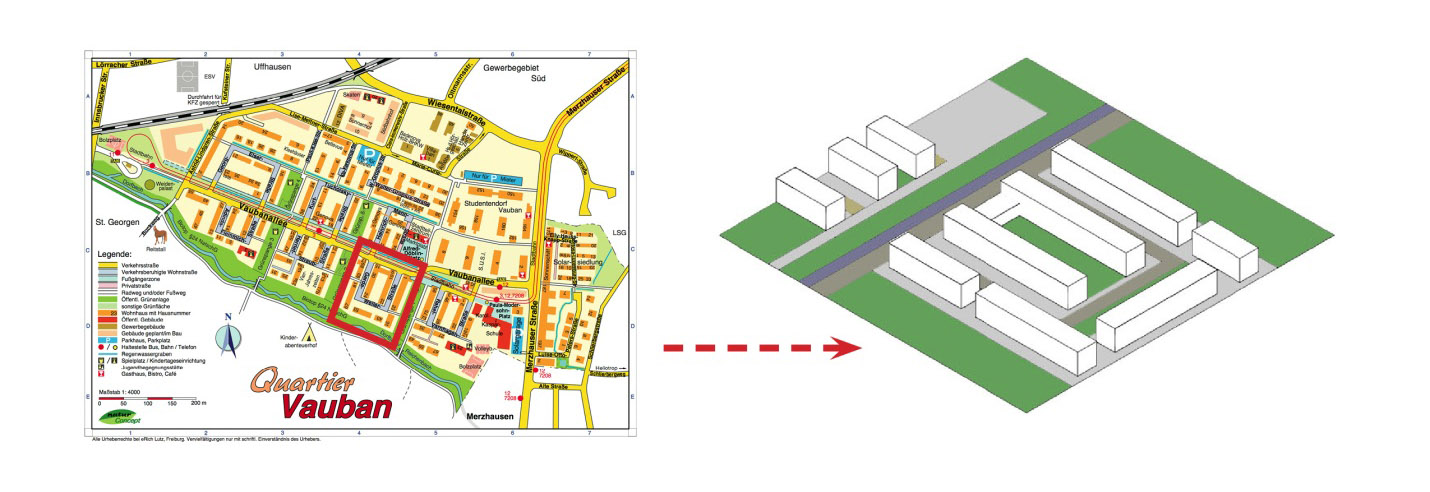
For example, one typical cluster from the Vauban low-carbon city in Germany can be selected and simplified as:
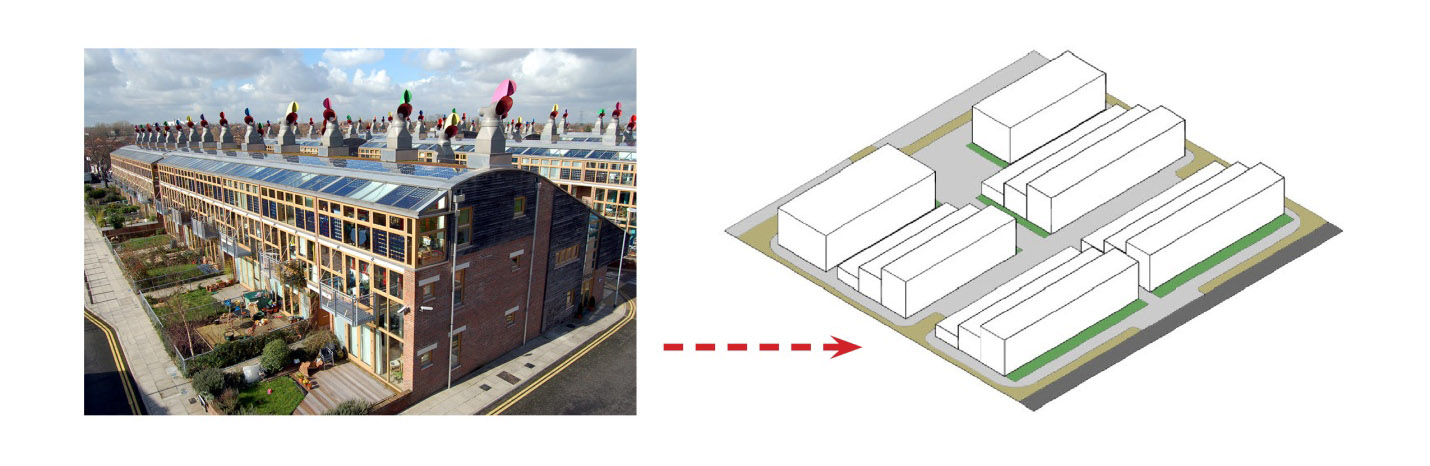
Buildings of the Bedzed low-carbon neighborhood in the UK can be simplified as a series of blocks with varied building heights:
II. Draw a Plan
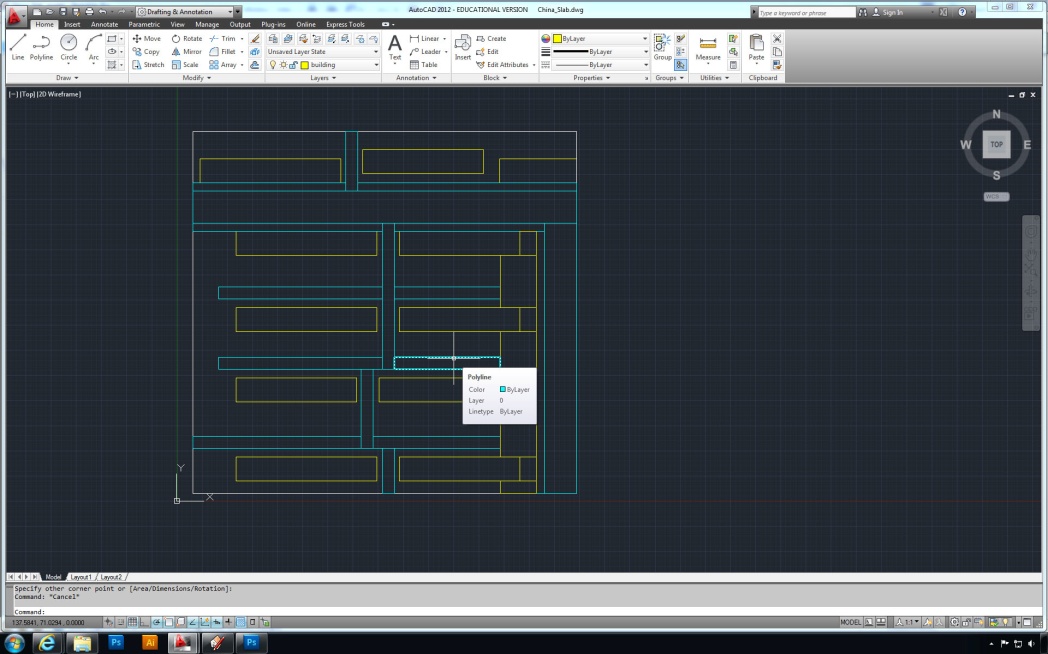
You can draw the plan for the simplified model with any software (such as AutoCAD, Rhino, SketchUp) that can eventually be imported into SketchUp. Please note that you need to be consistent in using METERS as unit for all plans and models.
Draw the boundary of the site, the roads and buildings in the plan. For the site, make it as simple as you can. Draw its boundary in a polyline. For buildings, draw each of them as quadrilateral in polylines. Deconstruct the complex forms, such as an "L" shaped building or a building with parts of different heights, into separate enclosed quadrilateral. Remember that you only want enclosed quadrilateral polylines. Each building footprint must be composed of only FOUR LINES. If you draw the buildings in Sketchup, draw each building separately and immediately convert it into a component, to ensure that the rectangle shapes don't bind with other shapes (see step IV below).
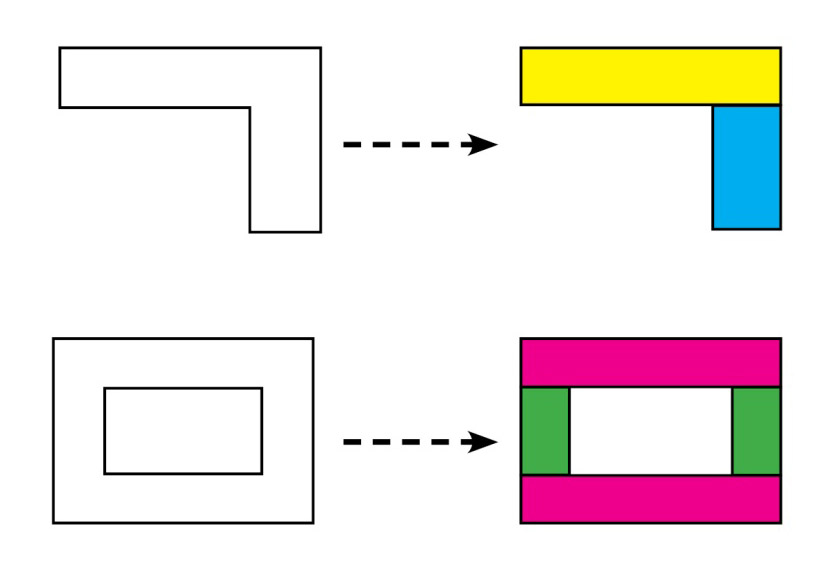
Fig. Examples of redrawing buildings into rectangles
For roads, you also need to redraw them into separate quadrilateral polylines. For those vehicular roads with sidewalks, draw only the parts where vehicles can use, and leave the sidewalks blank.
Here is an example of the plan of a simplified neighborhood:
III. Define the Types of Buildings and Roads
Define building and road types according to the following guides. Please write down the information (the following bullets) of each type you have defined.
A. Building Types:
Each building has one attribute in CityGML: "class".
Buildings with significant different values of the following attributes should be assigned to varied building types, which should be given different numbers in "class" under CityGML:
- Floor to floor heights
- Roof types (conventional, green, or solar panels)
- Window-to-wall ratios
- Shared wall ratios (e.g. 50% shared east walls, 100% shared south walls, etc)
- Building uses mix (or ratio of mixed use)
* Buildings with different orientations, depth, total heights, or total widths can be part of a single building type.
B. Road Types:
Each road has two attributes in CityGML: "usage" and "class".
For road "usage", there are two types:
- 'motor' for vehicular roads. Any road used by vehicles should be considered as 'motor' in usage. Those vehicular roads with sidewalks are also considered as 'motor'.
- 'ped' for pedestrian-only roads.
For road "class", roads with different values of the following attributes should be assigned to varied road types, which should be given different numbers in "class" under CityGML:
- Material of the roads
- Width of the roads
- Percentage of sidewalks
- Coverage of street trees
After you have written down the building types and road types, please check if the types are categorized appropriately as above. Please try to summarize and avoid too many building types or road types.
IV. Build SketchUp Models and Make Components
Here are steps of building SketchUp models and making components. In this part the layers of models are not important. Please note the key is to make every part of the model a separate component.
1. Delete the default "person" component at the origin of coordinate of the SketchUp interface.
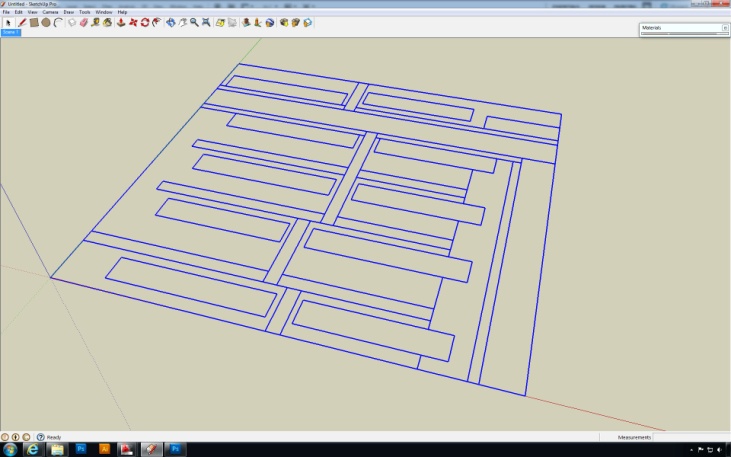
2. Import the simplified plan into SketchUp. You can import from your .dwg, .dxf, .3dm files into SketchUp. Please use the "tape measure" tool to check if the scale of the plan is the same as your plan in the unit of meter. Otherwise you need to scale the plan back into the original figures.
3. Make sure that the southwest corner of the plan is at the coordinate origin (0,0). Re-align the plan to the correct direction, so that the plan's north direction is aligned with the positive Y direction.
4. Redraw the site area. Use "line" tool in SketchUp to draw the boundary of the site. Make sure a surface is formed once the lines are enclosed.
5. Make the site area a component. Double-click the surface as selecting the surface and the lines of the site area boundary to make a component.
6. Create the other rectangular plane components ('green space' and 'parking') in the same way as the site 'area'.
7. Redraw building footprints. Use "line" tool to draw the boundary of each building. Make sure a surface is formed once the lines are enclosed.
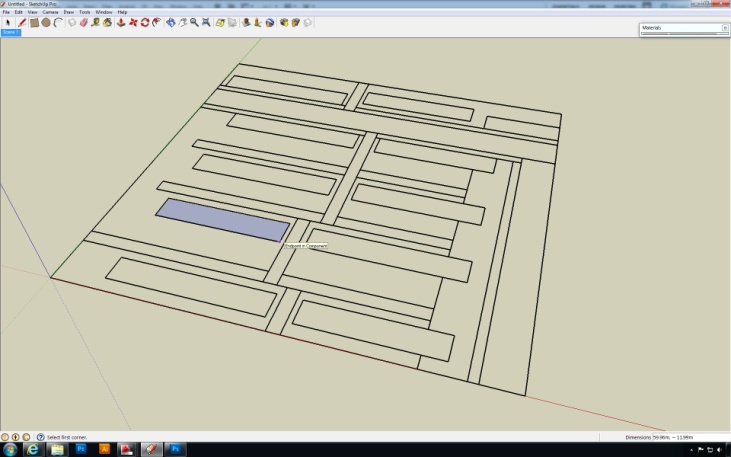
8. Extrude building footprints. Use "push/pull" tool in SketchUp to extrude the building to the correct height.
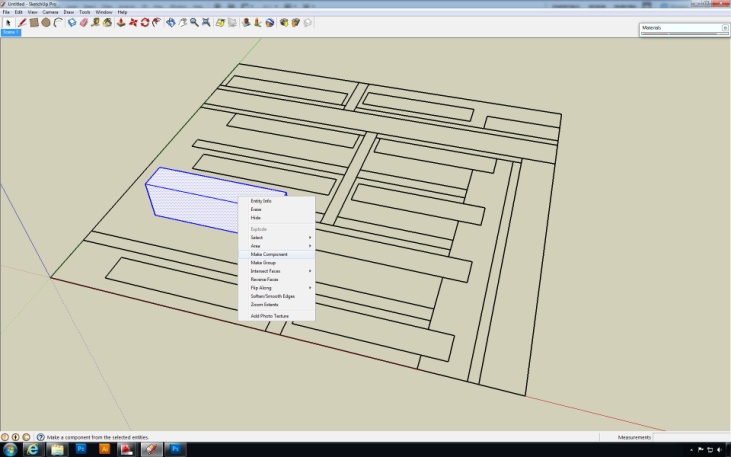
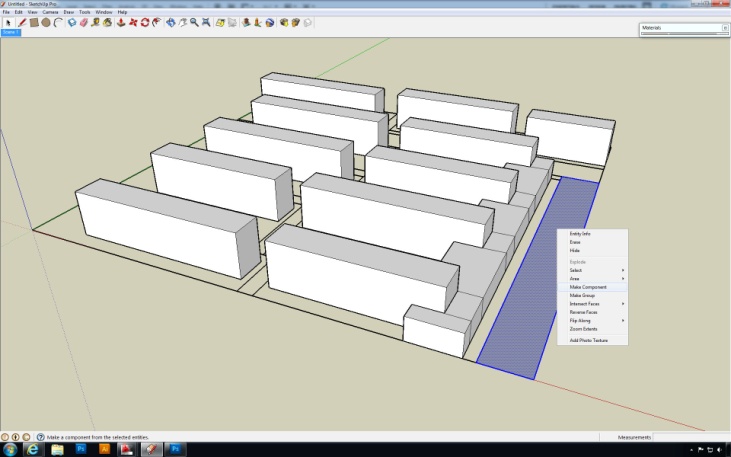
9. Make each building a component. Triple-click the volume of the building as selecting the whole volume. Then right click and select "Make Component" to make the volume a component.
10. Repeat Step 4 to 6 to make every free-standing building a separate component.
11. Redraw the building footprints that are partially attached to other buildings. Draw the rest of the building plans only after the "attached" buildings have been created as components. Otherwise the components may get mixed up rather than separate buildings.
12. Extrude the "attached" buildings. Use "push/pull" tool to extrude the building to its height.
13. Make each "attached" building a separate component from the building to which it is "attached". After creating components please check if the whole block is selected once you single-click any part of the building.
14. Redraw the road and make it a component. You need to redraw the boundary of one road and immediately make it a component.
15. Repeat Step 11 to each segment of road. After making the first road segment a component, you can draw the next one and make it another component, and so on. Otherwise the components may get mixed up. Make sure each quadrilateral segment of the road is a separate component.
16. Color the buildings and roads to mark different building types and road types. To help yourself to differentiate building types, especially when there are several building types, you can give the same color to buildings of the same type that you have defined in Step III. Do the similar thing to differentiate road types as well.

17. You may make multiple instances of one component in Sketchup, but DO NOT GROUP ANY COMPONENTS. The CityGML plugin will not export groups.
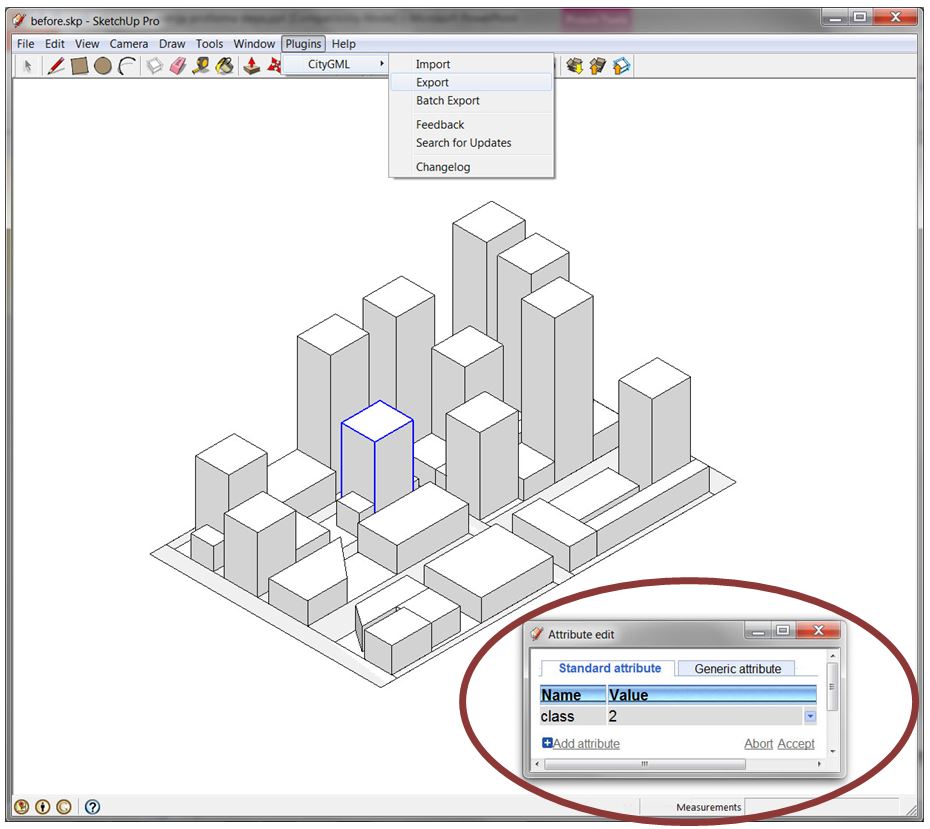
V. Input CityGML Attributes
In this part you will use SketchUp CityGML plugin to input the attributes of the types you have defined in Step III.
Site, Green Space, and Parking Information:
a. Select the site component, RIGHT CLICK (DO NOT use the Sketchup "Component Attributes" that are accessible through the Window menu -> "Component Attributes") on it and select "attribute->edit".
b. In the STANDARD ATTRIBUTE tab, click "Add Attribute".
c. In Name field, select "usage".
d. In Value field, type "area" (NOT 'site').
a. Click "Accept" in dialog box.
e. Click "Accept" in Attribute Edit window.
f. Use the same procedure to add attributes to 'green space' and 'parking'.
Building Information:
b. For each building component, right-click on one of the building instances and select "attribute->edit".
c. In the STANDARD ATTRIBUTE tab, click "Add Attribute".
d. In Name field, select "class".
e. In Value field, type a number (integer value) of the building type, as you defined in Step III.
f. Click "Accept" in dialog box.
g. Click "Accept" in Attribute Edit window.
Road Information:
a. For each road segment, right-click on shape and select "attribute->edit".
b. In the STANDARD ATTRIBUTE tab, click "Add Attribute".
c. In Name field, select "usage".
d. In Value field, type "motor" if the road is for vehicles or "ped" if the road is for pedestrians. For the vehicular roads with sidewalks, only give the "motor" value in usage.
e. Click "Accept" in dialog box.
f. In the STANDARD ATTRIBUTE tab, click "Add Attribute".
g. In Name field, select "class".
h. In Value field, type a number (integer value) for each of the vehicular road types or pedestrian path types as you have defined in Step III.
i. Click "Accept" in dialog box.
j. Click "Accept" in Attribute Edit window.
VI. Check and Export .XML files
Before exporting model, you need to check if
a. The model's southwest corner is at the origin (0,0,0) and the model is oriented in the correct direction. The majority of the model should be in Quadrant 1.
b. Every single part of the model is a component. Nothing else is left in the model.
c. Every component has been given appropriate CityGML attributes in Step V.
Revise the errors if there are any. Then you can export the model as CityGML file.
a. Select menu Plugins->CityGML->Export
b. Type a descriptive name in the Save dialog box. Use underscores (_) instead of spaces. Click "Save".
c. In the export dialog box, select LOD2.
d. Select additional layers to export, if necessary.
e. All other default values on all tabs should not be changed.
f. Click "Start Export".
g. Close Ruby console.
VII. Upload files to the Web Proforma
a. Click 'upload my own neighborhood' on the Energy Proforma webpage
b. Browse for and add the CityGML .xml file you just exported. You do not need to upload an attributes or image file. Click 'upload'.
c. On the next page, the Attributes page, make sure to give your neighborhood model a name at the top of the page. Click 'neighborhood' and change the number of households, the click 'building classes' and add the data for each of the building classes in your model. There will be one class per building in the model, but you only need to fill in the data for the number of classes that you actually have. In general, you should not change any of the attributes in the other sections. Click 'save' when finished.
d. On the next page, the Web Proforma 'interact' page, we cannot provide visual feedback at this time. However, you can review errors in your model by searching for in the debug output at the beginning or end of the page. Use the coordinates given for each piece of geometry, to locate the components or shapes causing the errors in SketchUp.
Some example error output: "buildingsMissingClasses":[],"otherComponentsMissingUsages":[{"polygon":[[]],"usage":"unlabeled plane"},{"polygon":[[]],"usage":"asdf","problem":"invalid label"},{"polygon":[[],[],[],[],[],[],[]],"class":1,"usage":"invalid label"},{"polygon":[[],[],[],[],[],[],[]],"usage":"invalid label"}],"componentsTooManySides":[],"totalBuildingComponents":0,"totalMotorComponents":0,"totalPedComponents":0,"totalGreenSpaceComponents":0,"totalParkingComponents":0,"totalAreaComponents":0,
e. You can edit the model's attributes by clicking 'view saved models' on the main webtool page, then clicking 'copy neighborhood'. If you want to keep the same attributes but upload a new CityGML file, click the 'copy attributes' link under your model's name instead.